LandArt7
Landscape Architecture + Art
Manifesto
As we are all designers, we all have contrasting views and perceptions of what makes a good or bad design. One element which links us all together are the stages of the design process through which exploring possibilities and constraints focuses our critical thinking and research towards a common objective.
Through this project we are forming an interactive design that will engage art, nature, people and place on a day-to-day basis. Our project will illustrate how different forms of a membrane structure, grid shells, origami and biology are composed together in a symbiotic relationship to form a sustainable concept.
Our plan / convention will address the physical and spatial parameters of our design with a thorough understanding of its role in our environment and its potential to function as a living space. The site we have chosen to implement our design is the spiritual center, which has a strong focus on nature and raw materials. Our plan / convention will draw elements from these and inform how our concept will develop.
Saturday, 12 May 2012
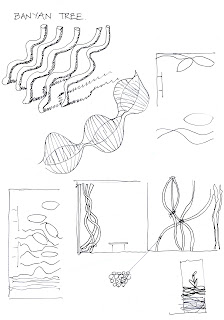
Botanical Drawing
Hey Everyone! I found this beautiful botanical drawing of a banyan plant on wiki. It is from the nineteenth century. Thought it might be inspiring...!
Monday, 7 May 2012
Group Workshop: Conceptualising the Design
Our group met up on Friday 4th, May to discuss and consolidate our ideas into design concepts. Below are the results of our workshop.
Process A: Form Finding
Process B: Conceptual Parabolic Forms
Process C: Installation Concepts
Process A: Form Finding
Process B: Conceptual Parabolic Forms
Process C: Installation Concepts
Sunday, 6 May 2012
Friday, 4 May 2012
Crochet: My Work In Wire
I have experimented with crocheting
in wire and here are some of the results.
I used silver beading wire and a number 5 crochet hook. One of the maquettes is crocheted in the
round, this was the first one completed.
The next maquette is crocheted flat as is the third one but it also has
small glass beads crocheted into it. These
maquettes were completed with 28-gauge wire, which is easily manipulated when
working but strong enough to hold its sculpted shape once made. I am now experimenting with different gauges
and types of wire and will see where that leads…!
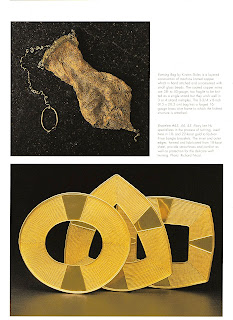
Crochet: Examples of Crochet in Wire by Other Artists
Here are some examples from the book “Textile Techniques In Metal: For Jewelers, Textile Artists and Sculptors” by Arline M. Fisch. These examples include the work of Arline Fisch and others worked in metal. They demonstrate the aesthetic of applying textile techniques to metal and the amazing results that can be achieved. Crochet examples are included. This is a direction we are exploring in this LAND ART SEVEN project.
Crochet: Examples of Crochet by Other Artists
Here are some examples of free form crochet from the book “The Crocheter’s Art: New Dimensions in Free-form Crochet” by Del Pitt Feldman. This type of crochet is called free form because it is three-dimensional and largely, if not fully, structurally self-supporting. This type of crochet is also made not to produce a garment but an object – be it aesthetical or functional in nature. It does not follow a pattern, but rather the maker determines what this will be whilst making by drawing on all their knowledge, skills and experience with the medium. I hope these examples give you a taste for crochet and open your mind to its endless possibilities!
Crochet: How to Work with Wire
I have been exploring the
potential of crocheting in wire for some months now. The best resource I have come across for
technical guidance is the book by Arline M. Fisch “Textile Techniques In Metal:
For Jewelers, Textile Artists and Sculptors” (please note title spelling of jewellers
is with one “l” only!). She is a very
well known American artist jeweller who uses textile techniques applied to metals
in her work. The book contains much
useful technical information, beautiful examples of her work and that of other
artists, and a step-by-step guide as to how to crochet in wire, which I am including
here.
Crochet: Basic Stitches
Here is a basic stitch
guide that visually explains the structural formulation of each different
crochet stitch. Please do not try to
learn the stitches from these diagrams alone. Here there is only one visual per stitch which
is understandable if you already know some crochet or a related textile
technique. I have instructions with multiple
images showing each step in the stitch process and what you need to do to
complete it. Much better if you are a
learner!
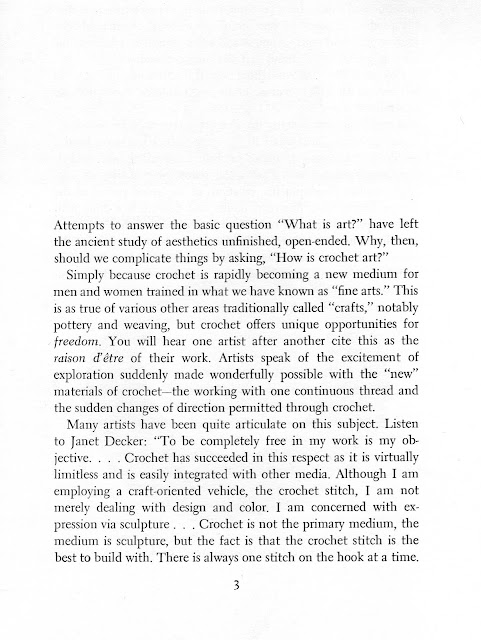
Crochet: Why Use this Traditional Craft to Make Art?
Here is
an excerpt from a book titled "The Crocheter’s Art: New Dimensions in
Free-form Crochet" by Del Pitt Feldman which I think answers this
question well. I also hope that it may explain to you why I am
interested in crochet as an artist and see such potential for it in
relation to public art.

Saturday, 28 April 2012
Autonomous Vertical Garden Irrigation
Very interesting project called Acoustic Mirror Moss by David de Buyser using sensor based technologies to constantly monitor moisture conductivity within a moss. Interestingly this complex project utilises DIY technology such as 'Arduino' which is readily available. If time restrictions and budget were not so limiting, I believe that this precedent could hold real potential for landart7's group project installation.
http://www.v2.nl/lab/projects/irrigation-system-for-urban-gardening
http://www.v2.nl/lab/projects/irrigation-system-for-urban-gardening
Monday, 23 April 2012
Grid shell + Tensile Membrane Concept
The concept illustrations above are an attempt to combine all the elements of our model which we are interested in, into a 'hybrid' of all concepts which merge into one structure. In consideration is the addition of a 'landscape architecture' element within this concept.
The principle idea is to use PVC plumbing pipe connected with elbow and T-joints to construct a hollow framework super-structure, this forms the 'Grid shell'. The form of this Grid shell is extracted from the rectilinear shapes of the Origami. A Tensile Membrane is then stretched over this framework.
The 'landscape' element is that the Grid shell structure can form the basis of an irrigation system which connects to existing roof rainwater drains. This system can then irrigate rapid growth plantings of grasses, snow peas, flowers, etc., placed throughout the Grid shell structure. Placed inside the PVC pipe, it may be possible to use light-weight volcanic rock, commonly used in hydroponic systems, for water absorbsion and as a growing medium. Through this concept we can speculate the possibility of this installation being a 'vertical garden' in addition to being an exhibition space, or installation art.
The Tensile Membrane has two purposes, one is to illustrate form, and the other is to provide shade for the growing plants. Also the idea arose whereby the Tensile Membrane material may also act as the growing medium for the plantings. This could potentially reduce the installations' overall weight and complexity assisting in construction and structural integrity. Additionally, the potential of using some sort of porous textile which absorbs water could be a real possibility.
Vertical Garden Irrigation
For a vertical garden to succeed and thrive, it needs to be well watered, especially if it is attached to a wall that is exposed to plenty of sun and wind. The easiest way to ensure that your plants are getting the amount of water that they need is to use an irrigation system. There are different kinds available so we’ve outlined what choices you have. Read on for more.
Gravity Fed Drip Irrigation Systems
One of the most common ways to irrigate a vertical garden is by the use of a gravity fed drip irrigation system. This is where a conventional drip irrigation system is installed at the top of the vertical garden. Water is released and it drips onto the top row of plants. As these plants are sufficiently watered, the water continues down through the effect of gravity, until the entire garden is watered. The excess water is collected at the bottom of the garden and is drained away. Alternatively, a pump can be installed to recycle the water.
Comprehensive Drip Irrigation Systems
If your plants require a lot of water regularly, you may want to install something a bit more comprehensive than a standard gravity fed drip irrigation system. In this case, you can choose to install drip irrigation lines on ever y row of your vertical garden, ensuring that each and every plant gets plenty of water. As with gravity fed drip irrigation, the excess water is caught at the bottom of the garden using a tray that drains it away or allows it to be recycled.
Watering Through a Pipe Network
Another way of watering your vertical garden involves using a pipe network. How it works is that a network of perforated plastic pipes runs throughout the entirety of the vertical garden system. Water (often infused with nutrients) is released through the perforations in these pipes at precise intervals and is then delivered to the plants. The release of the water is controlled by an electronic timer so it really is a case of set and forget for the most part (as long as you remember to keep the nutrients in the water at the correct concentration). Often, little soil is involved in this method so this is really a hydroponic form of irrigating your plants.
Subscribe to:
Comments (Atom)


